


Signs You Need a New Epson Projector or Lamp Replacement: A Professional 2026 Guide
August 21, 2026
Epson Projector Overheating Issues: A 2026 Guide to Troubleshooting and Prevention
August 23, 2026
Imagine settling in for a 4K premiere, only to find the opening credits look like they’re underwater. You’ve invested in a premium system for its legendary detail, so squinting at soft edges or fuzzy subtitles is a frustrating disruption. If you need to fix blurry Epson projector image issues, you aren’t alone. Many enthusiasts mistake complex optical issues for simple setup errors, leading to unnecessary stress during your favourite films.
We believe your home cinema should be a sanctuary of high-quality technology. Maintaining that crisp, professional standard requires a blend of physical hygiene and precise digital geometry. You shouldn’t have to fear damaging an expensive lens whilst attempting to achieve a clear view. It’s about understanding the synergy between your environment and your equipment.
This 2026 guide reveals the expert techniques used to restore absolute clarity to your screen. We’ll walk you through essential cleaning protocols, focus ring mastery, and advanced alignment settings. You’ll learn how to maintain your equipment like a pro and recognise exactly when it’s time to consult a specialist for a deeper service.
Key Takeaways
- Master the hierarchy of focus adjustments and learn to identify lens contamination before it impacts your viewing experience.
- Optimise your projector’s physical placement to eliminate the need for digital keystone correction, which often compromises edge-to-edge sharpness.
- Discover the most effective ways to fix blurry Epson projector image problems by aligning source resolutions and upgrading to high-speed HDMI cables.
- Protect your system from South African dust through proactive air filter maintenance that prevents internal overheating and blurred optics.
- Understand the long-term benefits of transitioning to Epson Laser Light Source technology for superior 4K Pro-UHD detail and texture.
Mastering the Physical Optics: Focus and Lens Maintenance
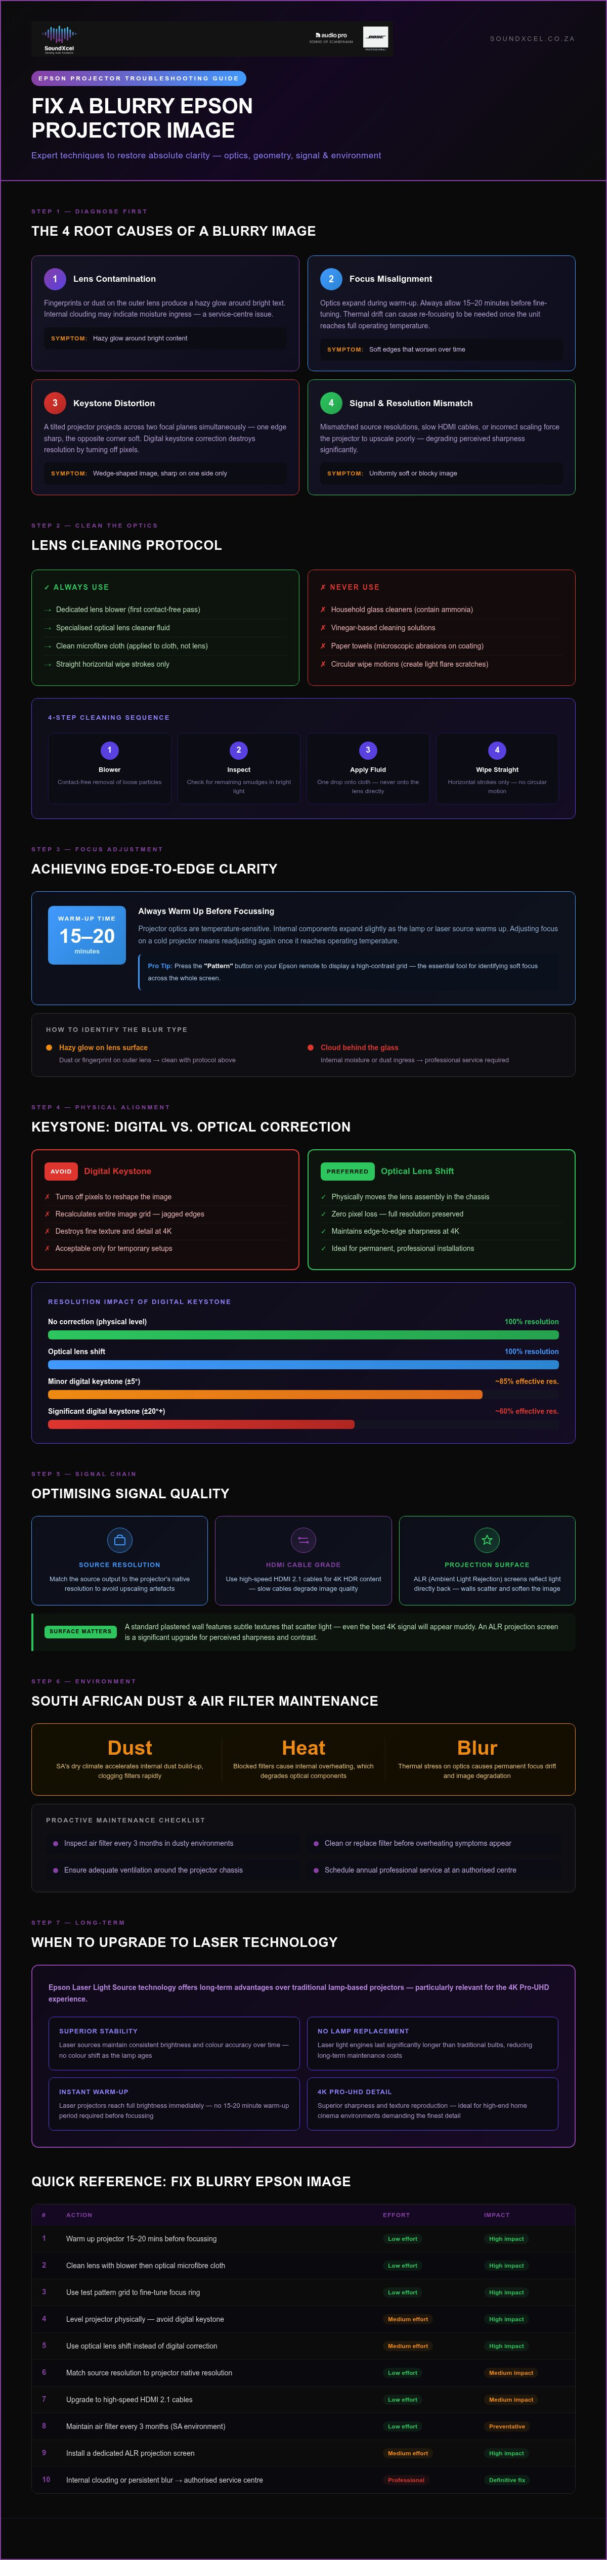
Begin your troubleshooting at the source of the light path. Achieving a sharp image begins with the glass, yet many enthusiasts overlook the most basic physical adjustments. To fix blurry Epson projector image problems, you must first ensure the hardware is operating at its peak thermal equilibrium. Projector optics are sensitive to temperature; they expand slightly as the lamp or laser source warms up. Always allow your projector to run for at least fifteen to twenty minutes before you attempt to fine-tune the focus. This ensures the internal components have settled into their operational state.
Differentiate between surface contamination and internal optical issues. A hazy glow around bright text often indicates a fingerprint or a layer of fine dust on the outer lens. One of the most effective ways to fix blurry Epson projector image issues is through a methodical cleaning protocol. However, if the blurriness appears as a cloud behind the glass, it may suggest internal moisture or dust ingress. This requires a professional service from an authorised centre to avoid damaging the internal light engine.
Never use household glass cleaners or paper towels. These contain ammonia or vinegar that can strip the delicate anti-reflective coatings from your Epson lens. Paper towels are surprisingly abrasive; they leave microscopic scratches that permanently diffuse light and ruin the professional finish of your home cinema. Use only specialised tools designed for high-end optics.
Step-by-Step Lens Cleaning Protocol
Maintain your optics with a gentle, systematic approach. Contact should always be your last resort. Start with a dedicated lens blower to dislodge loose particles without touching the glass. If smudges remain, apply a drop of specialised lens cleaner to a clean microfibre cloth. Wipe the glass in straight, horizontal lines rather than circular motions. This technique prevents the creation of circular micro-scratches that cause light flare during bright scenes whilst preserving the integrity of the coating.
Adjusting the Focus Ring for Edge-to-Edge Clarity
Press the “Pattern” button on your Epson remote to display a high-contrast grid. This tool is essential for identifying “soft” focus across the entire screen. Adjust the focus ring or motorised focus control until the centre lines are perfectly crisp. If you notice the image blurring slightly as the projector runs, it’s likely due to thermal expansion. Premium Epson glass minimises this drift, but you should always re-check the focus after the unit has reached its full operating temperature.
Projector Placement and Geometry: The Impact of Keystone
Physical alignment is the foundation of a sharp display. If you struggle to fix blurry Epson projector image issues, the culprit is often the angle of the device relative to the screen. When a projector tilts up or down, it creates a wedge shape. This forces the lens to project across two different focal planes simultaneously. One edge of your screen might appear crisp whilst the opposite corner remains stubbornly soft. Achieving true edge-to-edge clarity requires the projector to be perfectly parallel to the projection surface.
Digital keystone correction is often the primary enemy of high-definition detail. Whilst it’s a convenient tool for temporary setups, it physically degrades your resolution. Digital correction works by turning off pixels to reshape the image into a rectangle. This process forces the projector to recalculate the entire image grid, resulting in jagged edges and a noticeable loss of fine texture. For those seeking a professional 4K experience, physical levelling must always take precedence over digital shortcuts.
Understanding Digital vs. Optical Adjustments
Prioritise Optical Lens Shift whenever possible. Unlike digital keystone, lens shift physically moves the lens assembly within the chassis. This allows you to reposition the image without sacrificing a single pixel of resolution. Modern Epson units often include a Screen Fit feature to assist with initial alignment, but manual refinement ensures the best results. If your placement is fixed, consider investing in premium Epson Home Cinema Projectors that offer extensive optical shift ranges for easier installation.
Optimising the Projection Surface
The quality of your surface dictates the perceived sharpness of your content. A standard plastered wall often features subtle textures that scatter light, making even the best 4K signals appear muddy. Ambient Light Rejection (ALR) screens are designed to reflect light directly back to the viewer, significantly enhancing contrast and detail. Understanding the difference between a Projector Screen vs. Wall: Which Is Better for 4K? is vital for anyone serious about visual fidelity. A dedicated screen ensures that every pixel lands on a flat, uniform plane, eliminating the micro-shadows that cause perceived blur.
Optimising Signal Quality and Digital Resolution Settings
Optical perfection is only half the battle. If your digital signal is compromised, even the finest lens cannot fix blurry Epson projector image issues. Ensure your source device matches the projector’s native resolution exactly. For 4K Pro-UHD models, your media player should output a 2160p signal to avoid unnecessary scaling. If you’re using an older 1080p unit, forcing a 4K signal leads to downscaling artefacts that soften the final picture and introduce digital noise.
Cabling is the most common point of failure in the modern signal chain. Use high-speed HDMI 2.1 cables for any 4K setup, especially for runs exceeding five metres. A weak signal often manifests as “sparkles” or a subtle loss of fine detail that mimics a physical focus problem. If you’re using legacy analogue connections, use the “Auto” button on your remote to re-sync the pixel tracking and phase. This eliminates the horizontal jitter and ghosting that frequently plagues older AV setups.
Navigate to the “Image” menu to refine the “Sharpness” and “Detail Enhancement” sliders. Avoid the temptation to max out these settings. Excessive sharpening introduces white “halos” around objects, which actually masks fine texture. Set these levels whilst sitting at your primary viewing position to ensure the detail looks natural rather than over-processed. Modern Epson units handle 2026 handshaking standards with ease, but a poorly configured menu can still bottleneck your performance.
Configuring Source Devices for Maximum Detail
Check the output settings on your Apple TV, Shield Pro, or Blu-ray player. Set chroma subsampling to 4:2:2 or 4:4:4 to preserve colour edge definition and text clarity. Avoid “double upscaling” by letting only one device handle the resolution lift. If your Epson has superior 4K enhancement hardware, set your player to output its native source resolution. Disable “Motion Smoothing” or “Noise Reduction” on the source device; these features often introduce a “soapy” blur that destroys the natural grain of high-end cinematography.
Software Fixes within the Epson Menu
Use the “Super-Resolution” feature cautiously. It excels at sharpening 1080p content, but it can look artificial on native 4K streams. If fast-moving scenes look smeared or muddy, adjust the “Frame Interpolation” to a lower setting or turn it off entirely. This preserves the original film cadence and maintains sharpness during action sequences. When settings become too complex, perform a “Reset” on the current memory mode. This clears conflicting digital filters and provides a clean slate for recalibration.
Environmental Factors and Maintenance for South African Homes
South Africa’s unique climate presents specific challenges for high-end AV equipment. Fine dust particles are pervasive, particularly in the interior regions or coastal areas. These microscopic particles enter the air intake and eventually settle on the internal LCD panels. This creates “Dust Blobs”—out-of-focus green or magenta spots that can make your 4K content look muddy and indistinct. To fix blurry Epson projector image issues caused by environmental debris, you must adhere to a strict filter maintenance schedule. Check your filter every 100 to 200 hours of use. A clogged filter restricts airflow, leading to heat buildup that can warp internal lens elements over time.
Lamp life also plays a subtle role in perceived sharpness. As a lamp reaches the end of its functional lifespan, its light output diminishes. Our eyes often perceive a dimmer image as being less sharp, even if the focus ring is perfectly set. Check your lamp hour counter in the “Info” menu. If you’ve exceeded 3,000 to 4,000 hours, a fresh lamp might be the simplest way to restore that vibrant, out-of-the-box clarity. Modern laser models avoid this specific issue, but they still require clean airways to maintain their precision optics.
Airflow and Cooling Management
Heat is the primary enemy of precision optics. Maintain at least 50cm of clear space around your projector’s intake and exhaust vents to prevent heat-related lens warping. If you’re living at high altitudes, enable “High Altitude Mode” in the system settings. This increases fan speed to compensate for thinner air, ensuring the internal panels stay cool and the focal plane remains stable. Neglecting this setting in elevated regions can lead to premature hardware failure and a permanent loss of image detail.
Internal Optics and Professional Cleaning
Never attempt to open the projector chassis yourself. Epson projectors are sealed precision instruments; breaking the seal can introduce more dust or misalign the delicate LCD prism. If you notice persistent discolouration or a blur that won’t resolve through external cleaning, your polariser or LCD panel may be failing. These components require specialised diagnostic tools to replace correctly. For peace of mind and technical excellence, book a professional Epson service to ensure your home cinema remains in peak condition. An annual internal deep-clean is the best investment you can make to prolong the life of your premium optics.
When to Upgrade: Transitioning to 4K and Laser Technology
Sometimes, the ceiling of your visual experience is defined by the age of your hardware. If your efforts to fix blurry Epson projector image issues still leave you wanting more, it’s time to consider the technological leap of the 2026 range. Legacy lamp-based systems have inherent limitations in focus stability and pixel density. Upgrading to a modern platform doesn’t just resolve blur; it redefines the texture of every frame you watch. It’s the difference between seeing a picture and feeling an atmosphere.
Epson’s 4K Pro-UHD technology represents a significant advancement in text and texture clarity. Whilst traditional 1080p systems might struggle with fine subtitles or intricate fabric patterns, 4K Pro-UHD uses sophisticated pixel-shifting and image processing to deliver a crisp, professional finish. This technology ensures that every line is sharp and every edge is defined. For a detailed look at the latest options, consult our Epson Projector Price South Africa: A 2026 Home Cinema Buyer’s Guide.
The Future of Home Cinema: Laser Projectors
Laser light engines have revolutionised how we maintain focus. Unlike lamp models that require a warm-up period to reach thermal stability, laser projectors offer instant-on performance with zero “warm-up blur”. You get a perfectly sharp image from the moment you press play. These engines provide consistent brightness and colour accuracy for over 20,000 hours of use, ensuring your investment remains as sharp in year five as it was on day one.
A truly immersive experience requires more than just visuals. High-end Epson imagery deserves to be paired with world-class audio to create a balanced sensory environment. We specialise in creating seamless integration between your display and your soundstage. Discover how to elevate your room with a Bose Lifestyle and Epson Projector Setup for the ultimate 2026 home cinema experience.
Professional Consultation and Installation
Precision calibration can often unlock hidden detail in your existing unit. Our experts analyse your light-controlled environment to maximise contrast and perceived sharpness. We look beyond the focus ring to evaluate your screen material, ambient light, and signal chain. If you’re ready to transition to a professional-grade setup, your next step is booking a comprehensive home cinema audit with SoundXcel. We’ll guide you through the selection and installation process to ensure your 4K experience is nothing short of breathtaking.
Elevate Your Visual Standard
Achieving a sharp image is a deliberate process of balancing physical optics with digital precision. You now understand that regular filter maintenance and correct projector placement are essential to preserve the life of your equipment. By prioritising optical lens shift and matching your source resolution, you can effectively fix blurry Epson projector image issues and enjoy the professional detail your films deserve. Your environment plays a vital role; managing South African dust and heat ensures your lenses remain clear for years to come.
Maintaining high-quality technology should be a seamless part of your lifestyle. As an authorised Epson specialist, SoundXcel provides the expert home cinema integration and national South African support required to keep your system at its peak performance. Whether you need a professional deep-clean or are ready to transition to the latest 4K laser technology, we’re here to help you curate the perfect viewing environment. We focus on the intersection of luxury and functionality to enhance your daily entertainment.
Explore the Latest Epson Home Cinema Projectors at SoundXcel and transform your home theatre into a truly aspirational space. Your perfect picture is only a few precise adjustments away.
Frequently Asked Questions
Why is my Epson projector blurry on one side only?
This issue typically stems from improper physical alignment. If your projector is not perfectly parallel to the screen, the light travels different distances to reach each side. This creates two separate focal planes. Ensure the unit is level and the lens is centred. If you use digital keystone to correct a tilted unit, you will always struggle to fix blurry Epson projector image edges, as digital processing cannot compensate for physical focal depth.
How do I clean the internal lens of my Epson projector?
You should never attempt to clean the internal lens or LCD panels yourself. These components are housed in a sealed optical engine designed to remain sterile. Opening the casing often introduces more contaminants and voids your manufacturer warranty. If you notice internal “dust blobs” or hazy patches that external cleaning won’t resolve, contact a specialist for a professional service. They use clean-room environments to restore your internal optics safely.
Can a bad HDMI cable cause a blurry projector image?
A low-quality or damaged HDMI cable can definitely compromise your image clarity. Whilst digital signals don’t “blur” in the traditional analogue sense, insufficient bandwidth causes pixelation, “sparkles,” and a loss of fine texture. This is especially true for 4K Pro-UHD content requiring HDMI 2.1 speeds. If your 4K image looks soft or lacks its usual punch, swapping to a certified high-speed cable is a simple way to fix blurry Epson projector image problems.
What is the difference between focus and keystone correction?
Focus is a physical adjustment of the lens to sharpen the image, whilst keystone is a digital process used to square a distorted picture. Focus moves the glass elements to find the sharpest point on the screen. Keystone correction warps the digital grid to fix a “trapezoid” shape caused by a bad projection angle. Digital keystone always degrades resolution and introduces blur, so you should always prioritise physical placement and lens shift instead.
Why does my projector start sharp and then get blurry after 10 minutes?
This phenomenon is known as “focus drift” and is caused by thermal expansion. As the lamp or laser engine heats up, the internal components and lens elements expand slightly, shifting the focal point. It is most common in lamp-based projectors during the first fifteen minutes of operation. To avoid this, always let your system reach its operating temperature before you perform your final focus adjustments. Modern laser models have significantly reduced this effect.
Is it worth repairing an old Epson projector that has become fuzzy?
The decision depends on the root cause of the fuzziness. If the blur is caused by a dying lamp or a dirty filter, a simple replacement or service is highly cost-effective. However, if the internal LCD panels or polarisers have suffered heat damage, the repair costs can be substantial. In these cases, transitioning to a modern 4K laser projector often provides better long-term value, offering superior sharpness and twenty thousand hours of maintenance-free viewing.
How often should I clean the air filter on my Epson projector?
In South African environments, you should check and clean your air filter every 100 to 200 hours of use. Fine dust is a common local challenge that can quickly clog the intake. A restricted filter causes the internal temperature to rise, which can lead to lens warping and permanent optical damage. Regular maintenance prevents “dust blobs” from forming on the internal panels, ensuring your 4K cinema experience remains crystal clear and reliable.
Does a blurry image mean I need a new projector bulb?
A blurry image doesn’t always indicate a failing bulb, but declining brightness can make an image appear less sharp. As a projector lamp ages, its light output drops, reducing the contrast and edge definition of your content. If your lamp has exceeded three thousand hours, the dimmed output might be masking the true focus. However, you should always rule out lens contamination and signal settings before investing in a replacement lamp or a new unit.
