

Epson Ultra Short Throw Projector South Africa: The 2026 Home Cinema Guide
September 23, 2026
Surround Sound Speaker Placement: Immersive Audio Guide
September 25, 2026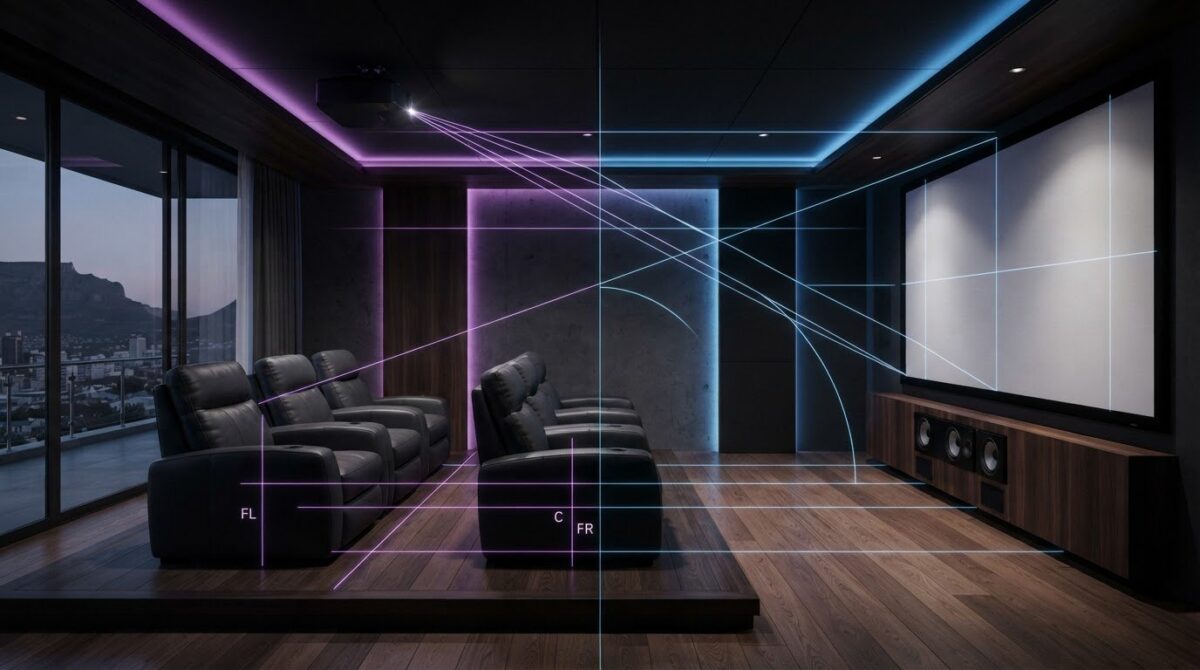
Buying the biggest display your wall can physically hold is the quickest way to ruin your home cinema. Before you drill brackets into plaster or guess your seating layout, using a reliable projector screen size calculator ensures you balance optical throw, visual field of view, and front-stage acoustic clearance from day one.
It’s easy to get tangled in throw ratio maths, diagonal conversions, and the fear of enduring neck strain from an overpowering screen. You shouldn’t have to guess whether an image will fit comfortably whilst leaving adequate space for your front-channel audio gear. This guide will show you how to master screen width and height calculations, lock in the correct seating distance, and pair your optics with surround sound for complete cinematic harmony. Ahead, explore the proven formulas, viewing angle standards, and practical layout steps to tailor your ideal entertainment space.
Key Takeaways
- Master the core mathematics of a projector screen size calculator by focusing on true image width rather than diagonal ratings to avoid common installation errors.
- Establish your primary seating distance first to unlock optimal cinematic viewing angles that prevent visual fatigue and neck strain.
- Calculate precise throw distances across standard, short-throw, and ultra-short-throw lenses to position your projector with complete confidence.
- Reserve dedicated wall space for front left, centre, and right audio channels to ensure your soundstage remains as expansive as your visual display.
- Apply a step-by-step room planning workflow that factors in ceiling clearances, eye-level benchmarks, and seating sightlines before mounting any hardware.
Understanding the Core Variables of a Projector Screen Size Calculator
Most retail listings market displays using a single diagonal figure. In practice, relying strictly on diagonal size creates major blind spots. A high-performance projection screen operates on fixed geometric relationships between horizontal image width, vertical height, and optical throw distance. Projector lenses cast light along a horizontal plane; therefore, usable image width dictates your optical requirements. Running measurements through a projector screen size calculator without understanding these underlying mechanics leads to costly hardware mismatches, misaligned mounts, and poor sightlines.
Deconstructing Screen Aspect Ratios: 16:9 Versus 2.35:1
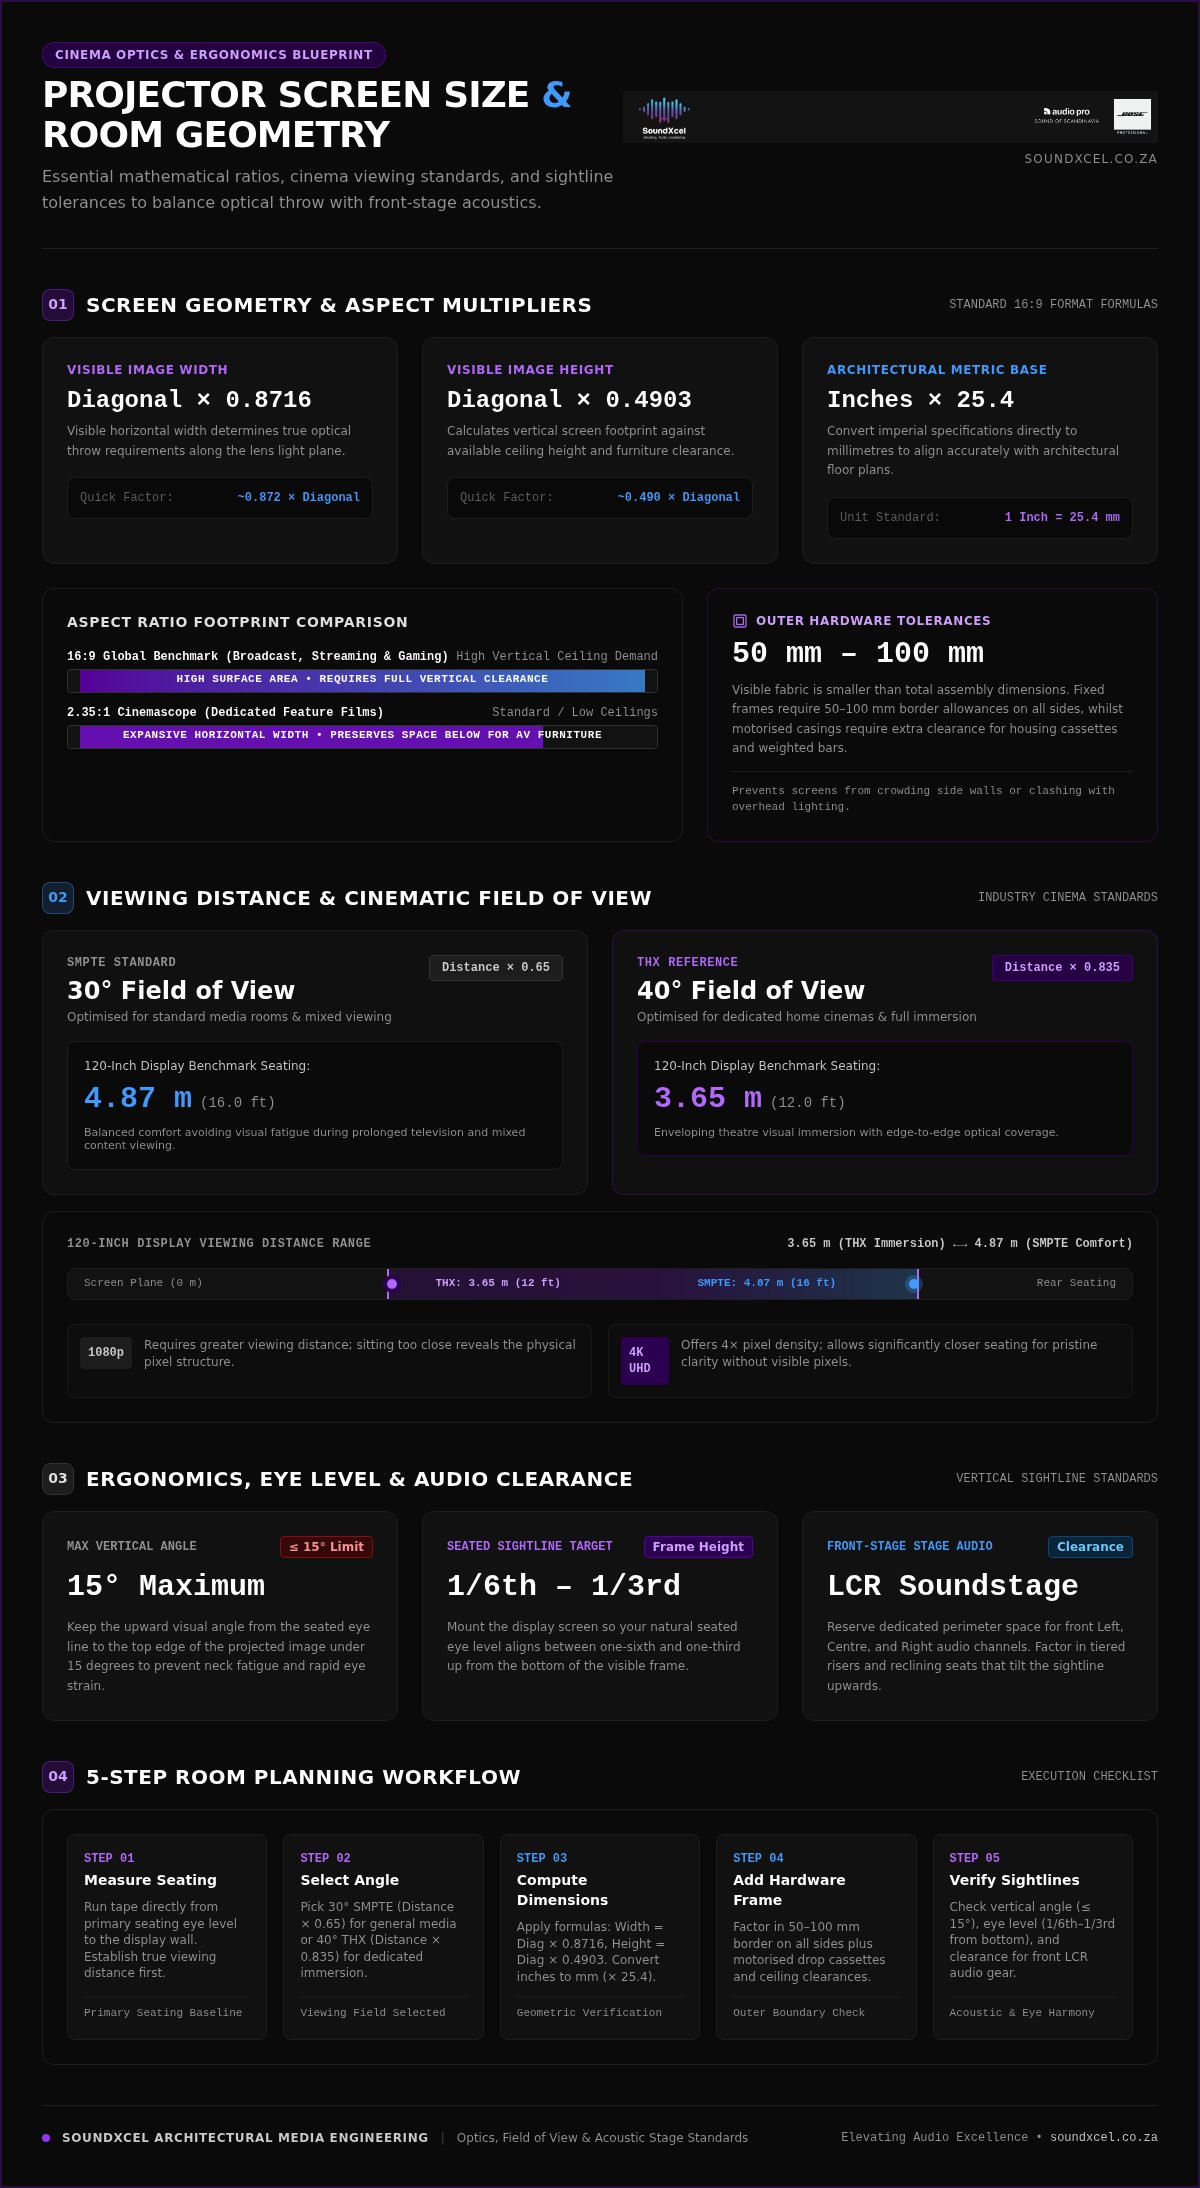
Aspect ratio determines how a display occupies physical wall space. The standard 16:9 format represents the global benchmark for broadcast television, modern streaming, and console gaming. It delivers expansive surface area but demands significant vertical ceiling clearance. In contrast, a 2.35:1 Cinemascope display caters specifically to widescreen feature films. It increases horizontal field of view without eating into ceiling height. For a 16:9 display, visible width equals diagonal multiplied by 0.872, whilst visible height equals diagonal multiplied by 0.490. Choosing Cinemascope lets you install a wider display in rooms with standard or low ceilings, preserving valuable space below for AV furniture.
Key Mathematical Formulas for Screen Width and Height
Translating theoretical specifications into a functional installation requires basic trigonometry. To establish the visible image boundaries for any standard 16:9 setup, use these reliable multipliers:
- Image Width: Diagonal (inches) × 0.8716
- Image Height: Diagonal (inches) × 0.4903
Always convert imperial figures into metric millimetres (multiply inches by 25.4) to match architectural floor plans. Crucially, visible fabric does not equal total assembly dimensions. Fixed-frame screens include structural borders between 50 mm and 100 mm on every side. Motorised drop-down screens feature housing cassettes, weighted bottom bars, and custom black drop sections. If your projector screen size calculator estimations ignore outer frame tolerances, your equipment will crowd side walls or clash with overhead lighting.
How to Calculate the Ideal Screen Size for Your Seating Distance
Measure your true viewing distance before choosing your canvas. Position a tape measure exactly where your eyes will rest in your primary seat, running it straight to the display wall. Guessing this gap risks either underwhelming visuals or intense visual fatigue. When using a projector screen size calculator, your viewing distance serves as the primary benchmark for selecting an appropriate diagonal measurement.
Resolution directly affects how close you can sit. With legacy 1080p projection, sitting too close reveals pixel structure. Modern 4K projection packs four times the pixel density, allowing your eyes to resolve pristine clarity at significantly closer seating positions without seeing individual pixels. Across South Africa, media enthusiasts frequently pair high-definition visuals with tailored acoustics through specialist suppliers like SoundXcel to ensure hardware perfectly matches the seating footprint.
SMPTE and THX Viewing Angle Benchmarks
Cinema engineering standards remove the guesswork from display sizing. The Society of Motion Picture and Television Engineers (SMPTE) recommends a baseline 30-degree horizontal viewing angle for general media rooms. To determine this standard diagonal, multiply your viewing distance in inches by 0.65. For a dedicated home theatre, THX recommends an immersive 40-degree field of view, calculated by multiplying viewing distance in inches by 0.835. For example, a 120-inch display functions best between 3.65 metres (12 feet) for THX immersion and 4.87 metres (16 feet) for standard SMPTE comfort.
Ergonomics, Eye Level, and Vertical Placement Calculations
Immersion should never cause physical discomfort. Follow these essential vertical placement guidelines:
- Vertical Viewing Angle: Keep the upward angle from your seated eye line to the top of the projected image under 15 degrees to prevent neck strain.
- Eye-Level Target: Mount the screen so your seated eye level aligns between one-sixth and one-third of the way up the total frame height.
- Reclining Adjustments: Factor in tiered risers and reclining theatre seats, which tilt your natural sightline upward by several degrees.
An oversized display mounted too high forces rapid eye movement and muscular tension. Aligning horizontal immersion with strict vertical ergonomics ensures effortless, fatigue-free viewing across long cinema sessions.
Calculating Projector Throw Distance and Lens Positioning
Positioning a lens demands rigorous calculation rather than casual estimation. The throw ratio defines the exact relationship between the distance from the lens tip to the screen surface and the width of the projected image. It is expressed as a simple ratio: Throw Ratio = Throw Distance / Image Width. Never substitute diagonal measurements into this equation; doing so throws out your mounting position by roughly fifteen per cent. A dedicated projector screen size calculator eliminates this risk by isolating horizontal width before establishing physical hardware brackets.
Optical profiles fall into three distinct categories based on throw ratios:
- Long-Throw (Standard): Throw ratios typically between 1.2:1 and 2.1:1, ideal for rear ceiling mounts or back-wall shelves.
- Short-Throw: Ratios between 0.4:1 and 1.0:1, casting expansive images from coffee-table distances.
- Ultra-Short-Throw (UST): Extreme wide-angle optics with ratios under 0.4:1, projecting massive frames from mere centimetres away.
Applying the Throw Ratio Formula
To establish your exact projector placement, rearrange the core formula: Throw Distance = Screen Width × Throw Ratio. If your planned 16:9 screen has an image width of 2.21 metres (roughly 100 inches diagonal) and your projector features a 1.32:1 to 2.15:1 zoom lens, your throw distance ranges between 2.92 metres and 4.75 metres. Premium chassis like Epson home cinema projectors offer expansive motorized lens shift alongside broad zoom ranges. This optical mobility allows you to align the image perfectly without using digital keystone correction, which compresses pixels and degrades picture fidelity.
Ultra Short Throw (UST) Versus Standard Long Throw Considerations
Ultra-short-throw projectors redefine smaller entertainment rooms. Because they sit directly beneath the display (often within zero to four feet), they eliminate walking shadows completely. However, their steep projection angle demands absolute precision. Your display wall must be completely flat; any subtle curve creates noticeable wave distortion along the upper edge. Standard long-throw projectors remain far more forgiving of wall imperfections and accommodate ceiling obstacles like structural bulkheads, chandeliers, or dropped light fixtures through robust optical zoom adjustments.
Balancing Screen Dimensions with Front-Stage Audio Clearance
Immersive cinema relies on acoustic realism just as much as visual scale. A frequent design pitfall is running screen fabric completely edge-to-edge across a front wall. Doing so crowds your audio gear into room corners or pushes speakers behind solid vinyl, which severely muffles dialogue clarity. A sophisticated projector screen size calculator workflow factors in acoustic boundaries alongside optical throw, ensuring your visual display and front-stage audio operate in total synergy.
Your material selection dictates your speaker placement options:
- Acoustically Transparent (AT) Screens: Micro-perforated or woven materials let sound waves pass through effortlessly, allowing speakers to sit directly behind the screen image.
- Solid Vinyl Screens: High-contrast reflective fabrics reflect acoustic energy, requiring all front-channel speakers to sit completely outside the frame boundaries.
Acoustic Clearance and Stereo Separation Dimensions
Flawless front-stage imaging requires precise spatial geometry. Front left and right speakers should form an equilateral triangle with your central seating position, creating an authentic stereo image. Squeezing a screen wall to the margins forces speakers right against sidewalls, generating muddy early reflections. Maintain at least 450 mm to 600 mm of horizontal clearance between the outer screen frame and flanking room corners. Integrating a dedicated Bose sound system within these calibrated margins ensures expansive sound effects track movements across the display with pinpoint accuracy.
Screen Height Considerations for Centre Channels and Soundbars
Centre channels anchor on-screen dialogue. If you opt for a solid screen, place the centre speaker directly beneath the lower bezel, angling the high-frequency tweeter upwards toward seated ear level. Never wedge a centre channel flush against the bottom border; allow at least 100 mm to 150 mm of vertical breathing room to eliminate edge diffraction. For comprehensive guidance on synchronising multi-channel equipment with projection hardware, explore our detailed Bose Lifestyle and Epson projector setup guide.
To align your room layout with balanced visual and acoustic hardware, consult our technical team at SoundXcel for nationwide cinema advice across South Africa.
Step-by-Step Practical Calculation Workflow for Your Room
Transforming spatial theory into a flawless home cinema requires a methodical plan. Skipping straight to purchasing hardware without verifying physical room limits often leads to mounting compromises and obstructed views. Applying a structured workflow bridges the gap between digital estimates and real-world performance, ensuring your projector screen size calculator inputs reflect the true spatial dynamics of your environment.
Execute your cinema design using this sequential five-stage checklist:
- Survey the Perimeter: Capture raw architectural dimensions, noting ceiling drops, door clearings, and existing power outlets.
- Benchmark the Primary Seating: Fix your prime listening and viewing seat, verifying eye height and sightlines over secondary risers.
- Target the Format: Match aspect ratio to your dominant viewing habits, selecting 16:9 for versatile gaming and television or 2.35:1 for dedicated cinematic content.
- Compute Screen Boundaries: Establish maximum frame dimensions while keeping mandatory soundstage clearance for front left, centre, and right channels.
- Verify Lens Placement: Calculate required optical throw distance and confirmed projector mount location against ceiling joists.
Compiling Your Physical Room Measurement Sheet
Draft an accurate floor plan before handling tools. Document every window, doorway swing, and structural ceiling beam that might interrupt light paths or speaker placements. Identify internal conduit routes and ceiling truss positions early, because hanging a projector bracket demands solid structural timber. A quick overhead layout diagram confirms walking paths remain open and guarantees your seating positions do not sit directly against reflective rear boundaries.
Verifying Optical and Acoustic Alignment Before Purchasing
Assess real-world room lighting before placing hardware orders. Even the sharpest 4K projector needs adequate ANSI lumen output to retain punchy contrast across large surfaces, especially in living spaces with residual ambient light. Confirm the physical chassis depth and ceiling mount drop; a deep projector casing shifts the lens forward, reducing your functional throw distance by several centimetres. Partnering with cinema specialists across South Africa ensures your chosen optics and multi-channel surround sound align seamlessly before the first fixing enters your wall.
Bring Your Tailored Home Cinema Vision to Life
Designing an exceptional cinema space doesn’t require guesswork. By moving beyond basic diagonal metrics and applying a rigorous projector screen size calculator workflow, you ensure your room achieves total architectural and acoustic balance. Matching optical throw ratios with THX and SMPTE viewing standards secures pristine picture quality without eye strain, whilst leaving dedicated clearance for your front channels guarantees lifelike stereo separation.
Bringing these calculations to life requires precision hardware that matches your room’s exact boundaries. As an authorised supplier of Epson home cinema projectors and premium Bose audio systems, SoundXcel delivers the expert guidance needed to align optics with immersive acoustics. Enjoy nationwide delivery and specialist customer support across South Africa as you craft your dream entertainment layout. Explore Epson home cinema projectors and premium audio at SoundXcel to turn your blueprint into a reference-grade cinema experience.
Frequently Asked Questions
How do I calculate what size projector screen I need for my room?
Measure your primary viewing distance in inches and multiply it by industry viewing angle benchmarks. For a standard 30-degree field of view, multiply your seating distance by 0.65 to find the diagonal size. For a 40-degree cinema experience, multiply distance by 0.835. Plugging these numbers into a projector screen size calculator verifies your maximum screen width whilst preserving necessary wall margins for your front surround sound speakers.
What is the formula to calculate projector throw distance from screen width?
Throw distance equals image width multiplied by the projector lens throw ratio. For instance, projecting onto a screen with an image width of 2.2 metres using a 1.5:1 lens requires a mounting throw distance of 3.3 metres. Never use diagonal screen measurements for this equation. Horizontal image width remains the only accurate geometric metric for determining the physical space between your projector lens and the screen fabric.
How far should I sit from a 120-inch projector screen?
You should sit between 3.65 metres and 4.87 metres away from a 120-inch display. Seating at 3.65 metres provides an immersive 40-degree field of view that matches THX cinema standards for modern 4K content. Extending the distance to 4.87 metres yields a relaxed 30-degree viewing angle aligned with SMPTE standards, making it ideal for casual television broadcasts, sporting events, and mixed media spaces.
Is a 16:9 or 2.35:1 aspect ratio screen better for home cinema?
A 16:9 screen is better for versatile rooms hosting streaming television, sports, and gaming alongside films. It matches standard high-definition broadcasts without vertical pillarboxing. A 2.35:1 Cinemascope screen excels in dedicated cinema spaces focused strictly on widescreen feature films. Cinemascope expands horizontal scale across rooms with lower ceiling heights, eliminating horizontal letterbox bars and giving feature movies a true theatrical proportion.
How high off the floor should my projector screen be mounted?
Mount your screen so your seated eye level sits between one-sixth and one-third of the total image height from the bottom edge. In typical domestic seating, this places the bottom border roughly 600 mm to 900 mm from the floor. This height preserves comfortable sightlines, leaves adequate vertical room for a dedicated centre-channel speaker or soundbar, and keeps upward head tilt safely below 15 degrees.
Can a projector screen be too big for a room?
Yes, an oversized screen creates eye strain, induces motion sickness, and compromises your audio setup. Sitting too close to a massive screen forces your eyes to dart back and forth across the frame during action sequences. Stretching screen fabric wall-to-wall also eliminates space for front-channel speakers, forcing them into corners where sound reflections degrade acoustic clarity and muffle dialogue.
What is the difference between projector screen size and image size?
Image size refers strictly to the illuminated visual picture projected onto the surface, measured by active height and width. Screen size encompasses the total physical hardware footprint, including the active surface, border masking, outer frame extrusions, and any motorised cassette housing. When planning your room with a projector screen size calculator, always incorporate these structural borders to ensure the assembly fits your wall without colliding with architectural trim.
